
Inventory — User Manual
Also searched as: stock levels, yard stock, quality grade, resaw, custom cut, transport unit, mill inventory, stock in, stock out, receiving, dispatch, movement log, chain, lot, in-out.
What is Inventory?
Inventory tracks the lifecycle of timber stock after it has been received from a tally sheet and before it is shipped, processed, or moved out. It answers three questions for operations teams: what stock is available right now, where is it, and what has happened to it over time.
Inventory is the bridge between Tally Sheets and Consignments. A Stock Unit created in a tally sheet can be linked to a Consignment and received into inventory in either order — there’s no required sequence. See “Three Ways Stock Becomes a Batch” below for exactly how each way of receiving stock affects what details (Supplier, Purchase Date, Payment) end up showing on the resulting batch.
How to Access Inventory
Open Main Menu → Inventory. Inventory is four separate pages, not tabs on one screen:
- Overview — current stock position and the three core actions
- In/Out — the movement ledger
- Processing — mill/conversion runs (Custom-Made / Re-saw)
- Operators — manage mill operators
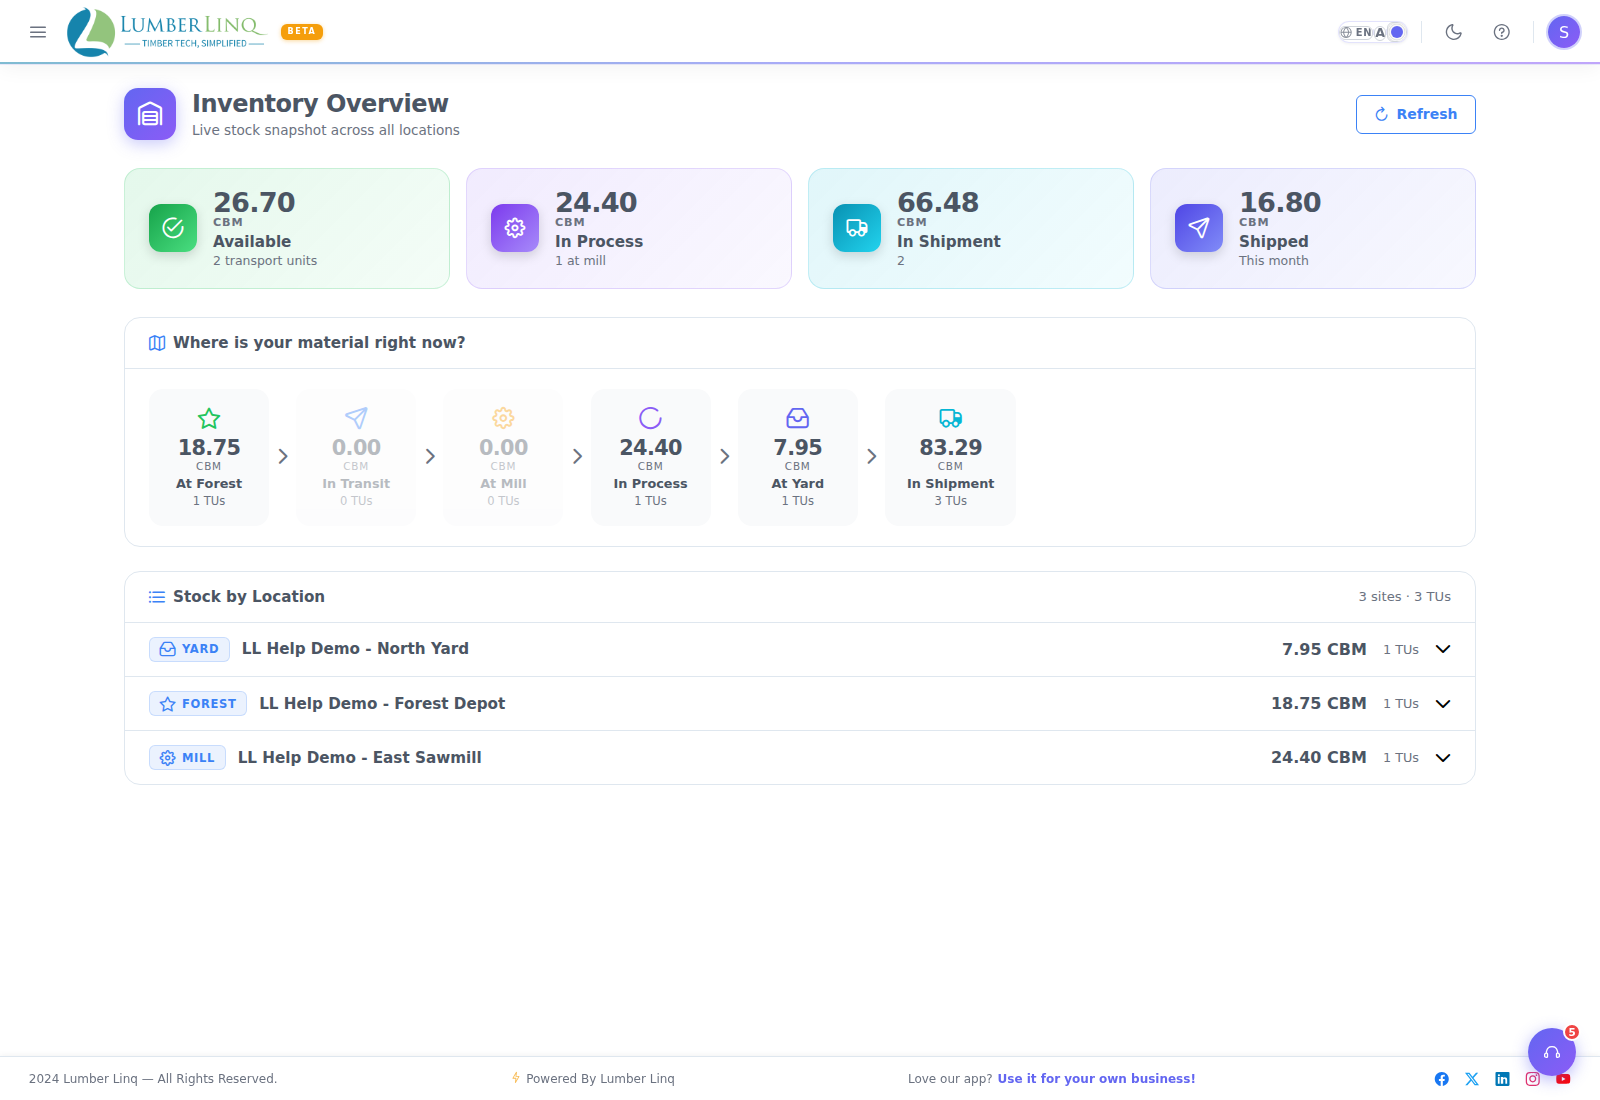
Overview — Reading the Stock Position
Open Overview first before planning a consignment or checking location capacity. Stock is grouped into six stages, shown as clickable cards (click a card to filter the location list below it):
- At Forest — available stock at a Forest-type location
- In Transit — stock physically moving (consignment status Stuffed / Gate Out / In Transit)
- At Mill — available stock at a Mill-type location
- In Process — stock currently going through a processing run
- At Yard — available stock at a Yard, Warehouse, or Port location
- In Consignment — booked into a consignment but not yet physically moving
Alongside the stage cards, KPI totals show available CBM, in-process CBM, in-consignment CBM, CBM shipped this month, and total CBM tied up in open lots.
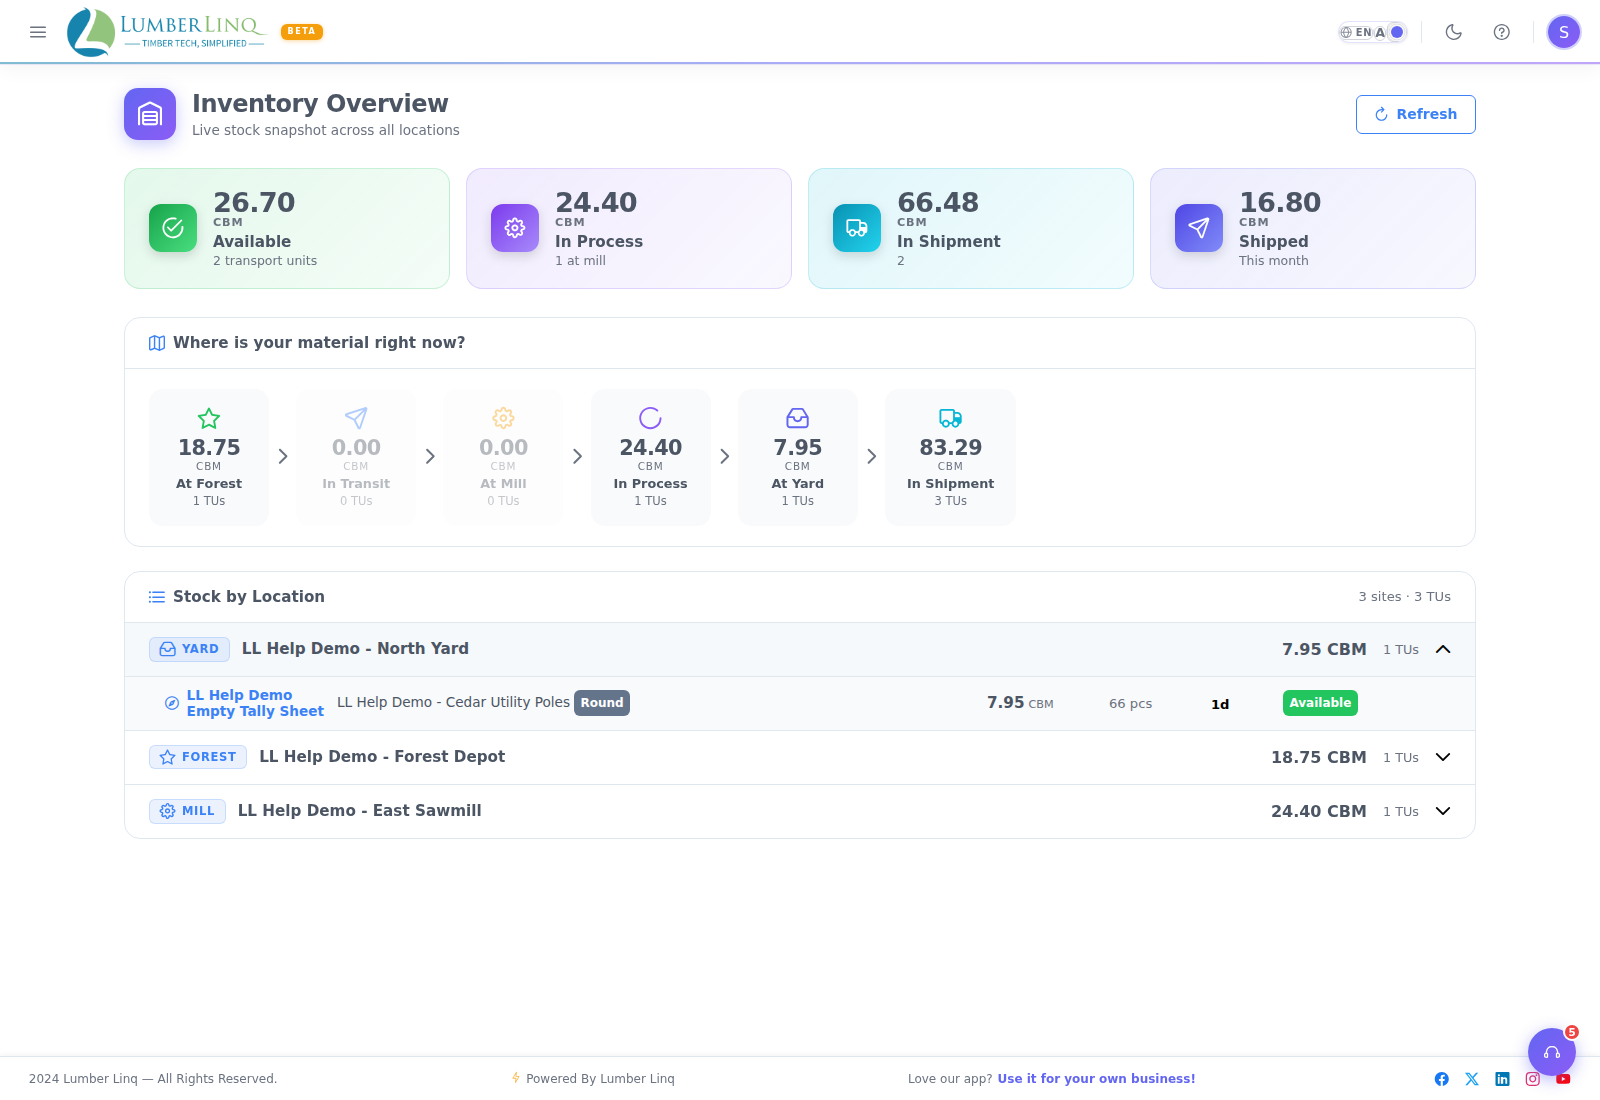
The Core Actions
Two buttons sit at the top of Overview:
- Opening Stock — add the stock you already have, usually when you first start using LumberLinq (needs the Inventory Receive and Tally Add permissions). It opens a new Stock Unit — see “Adding Your Opening Stock” below.
- Mill Run — opens the New Processing Run dialog straight away
New deliveries come in through their own Stock Unit (Receive into Inventory in the ⋮ menu at the top of the Stock Unit page, or automatically from a purchase Consignment). Stock goes out through a sale Consignment.
Before you can receive a Stock Unit into inventory it needs a Product, a Location, a transport mode (not for opening stock) and at least one saved tally row — otherwise Receive is greyed out or refused with a message saying what’s missing.
Only the actions your account has permission for are shown — if you don’t see Opening Stock or Mill Run, ask an admin to grant it.
Adding Your Opening Stock
When you start with LumberLinq, add all the stock already in your yard first:
- Inventory → Overview → Opening Stock. A new Stock Unit opens with Stock In already chosen and an Opening stock banner.
- Pick the product, the site (where the stock is) and the origin, then Save. No transport mode is needed — there’s no truck behind opening stock.
- On the Tallysheet tab, enter the pieces: Square — thickness × width × length × pieces; Round — girth × length. Save the rows.
- Open the ⋮ menu and press Receive into Inventory. The stock goes into inventory, the tally locks, and the In/Out page and Stock Statement show a line noted “Opening stock”.
Opening stock gets its own batch with a Starting Stock badge — it is never mixed with stock you buy later. A Consignment is optional: link one only if you want the purchase record (supplier, money, documents). Linking it later never adds the stock a second time. Opening stock has nothing to reconcile, so a mill run on it never asks you to type CONFIRM. Each opening-stock Stock Unit counts toward your plan’s Stock Unit limit like any other.
Three Ways Stock Becomes a Batch
Every batch of stock shown in Overview got there one of three ways. Which way decides what details (Supplier, Origin, Purchase Date, Payment) it shows — this is normal, not a bug, if a batch is missing one of these.
1. Opening stock (the “Opening Stock” button) — stock you already physically have, most commonly when you first start using LumberLinq. It is a normal Stock Unit with a full tally, received into its own Starting Stock batch. Origin comes from the Stock Unit. There’s no Supplier, Purchase Date or Payment unless you link a purchase Consignment to it later — that’s expected. (Batches typed in by hand with the old Stock In form before 2026-09-28 also show the Starting Stock badge.)
2. A real delivery received with no Consignment attached — a domestic delivery, an internal transfer, or self-harvested wood: tallied normally, then received into inventory directly from that Stock Unit’s own page (the “Receive into Inventory” button), with no Consignment involved at all. Supplier and Origin come from that delivery’s own tally record. Purchase Date and Payment don’t apply here — nothing was purchased, so there’s nothing to show.
3. A real delivery tied to a Consignment (an actual purchase) — Supplier, Purchase Date, and Payment status all come from that Consignment. These are shown on the batch’s own detail popup, under a “Purchased from” section. If a batch was built up from deliveries belonging to more than one Consignment, each one is listed separately with its own details — never averaged or mixed into one misleading value.
Good to know — order doesn’t matter. You can receive a delivery into inventory before its Consignment is created, or link the Consignment first and receive later — both work. If you receive first, the batch will show no Supplier/Purchase Date/Payment at that point (correctly — no Consignment exists yet). The moment you link that same delivery to a real Consignment afterward, those details appear automatically on the batch — you never have to redo the receipt or edit anything by hand.
Where to see these details: open Inventory → Overview, click any batch card to open its detail popup. Supplier and Origin (when set) show near the top. Purchase Date and Payment (for Consignment-linked deliveries) show further down, under “Purchased from.” Payment status is only visible to Admins or staff with Shipment access — everyone else still sees Supplier, Origin, and Purchase Date.
A fourth way, from the mill itself: a batch produced by a completed Processing Run (see “Processing” below) is labelled Mill Output — it was never bought or hand-typed, so Supplier/Purchase Date/Payment don’t apply to it, same reasoning as the other methods above.
Batch Type Badge
Every batch card shows a small colored badge naming which of the four ways above it came from: Starting Stock (hand-typed), No Purchase on File or Partially Linked (a real delivery with no purchase, or only some of its deliveries linked to one — both carry a small (?) icon explaining why), Linked to a Purchase, or Mill Output. Use this badge to spot at a glance which batches still need a Consignment linked, without opening each one.
Open Stock Lots
Below the action strip, Overview lists every open stock lot — a batch of stock still available to receive against, process, or dispatch. Click a lot to see its full movement history and its chain — the lineage back to the processing run or tally sheet that produced it. A lot’s status is Open, In Process, Depleted, or Closed.
Filtering and sorting the list: a row of filter chips above the batches lets you narrow the view to All, Needs Attention (No Purchase on File / Partially Linked), At the Mill (a Mill Run is currently queued, running, or paused against it), From the Mill (Mill Output batches), or Finished (fully used-up batches, otherwise hidden from this list). Only one filter applies at a time. A Sort dropdown next to the chips reorders the list — Newest First (default), Oldest First, Name A-Z, or by remaining stock amount.
Mill Activity badge: if a Mill Run currently has a batch reserved, a second badge shows Queued for Milling, At the Mill Now (with a gentle pulse while it’s actually running), or Paused. Tapping this badge jumps straight to that Mill Run on the Processing page.
What is the Chain?
The Chain is the “family tree” for one specific batch of stock — proof of where it actually came from and where it actually went, all in one place, without you having to manually piece it together from separate purchase, processing, and sale records.
It’s not a separate page of its own — you won’t find it in the main menu. To see it, open Inventory → Overview, find the stock lot you want, and click View Chain on that lot to expand its full history right there — every generation back to where the trail started, all shown at once (not one step at a time).
A chain can show, depending on that lot’s own history:
- Earlier generations — every source lot and the processing run that produced each one, all the way back to the original receipt; the oldest one also shows its own Batch Type badge and, if it came from a real purchase, its Supplier/Purchase Date/Payment
- This Lot — the batch you’re looking at, with how much was received and how much is still remaining
- Dispatches — shipments this lot’s stock went out on
- Output Lots — if this lot was itself re-sawn into something else, the new lot(s) that came out of it
A lot with no upstream source and no downstream activity yet will just show as new, unprocessed stock — that’s normal, not an error.
Full Trace — the Family Tree on One Screen
Full Trace draws the whole chain as boxes you can open one step at a time: Consignment → Stock Unit → batch → processing run → output batch → the sale. Open it with the Full Trace button on a batch’s detail popup (Overview) or on a processing run’s details. It needs the Full Trace right — Admins have it; others can be given it in RBAC.
- ▼ under a box shows what came next (what the batch was milled into, which sale took it).
- ▲ above a box (“See where this came from”) moves up to its source; when a batch was pooled from several purchases you pick which one.
- On each box: 👁 a quick view, 🕘 its history (who did what, when). + / − zooms the whole tree.
- A supplier’s name shows only to people with the Finance right.
In/Out — The Movement Ledger
Open Inventory → In/Out to see every stock movement in chronological order — the audit trail for inventory. Movement types: IN (received), OUT (dispatched), Proc IN (entered a processing run), Proc OUT (produced by a processing run), In Consignment (assigned to a consignment), and Adjustment. Filter by movement type (chips at the top) or by date range.
- Each row is one sentence, e.g. “Sent to mill 1.560 m³ Teak from SU-000001 🚛 PQRS1234 for job PR-2026-0022”. The Stock Unit, batch, mill job and consignment ids are chips — tap one to see its details (a bottom sheet on a phone).
- Mill job rows open a Whole job panel: started → finished, input → output and wastage.
- Search one item: type a Stock Unit, container / truck number, batch, mill job or BL number in the search box to see only its rows. Export then gives just those rows, and Open full statement opens that item’s Stock Statement.
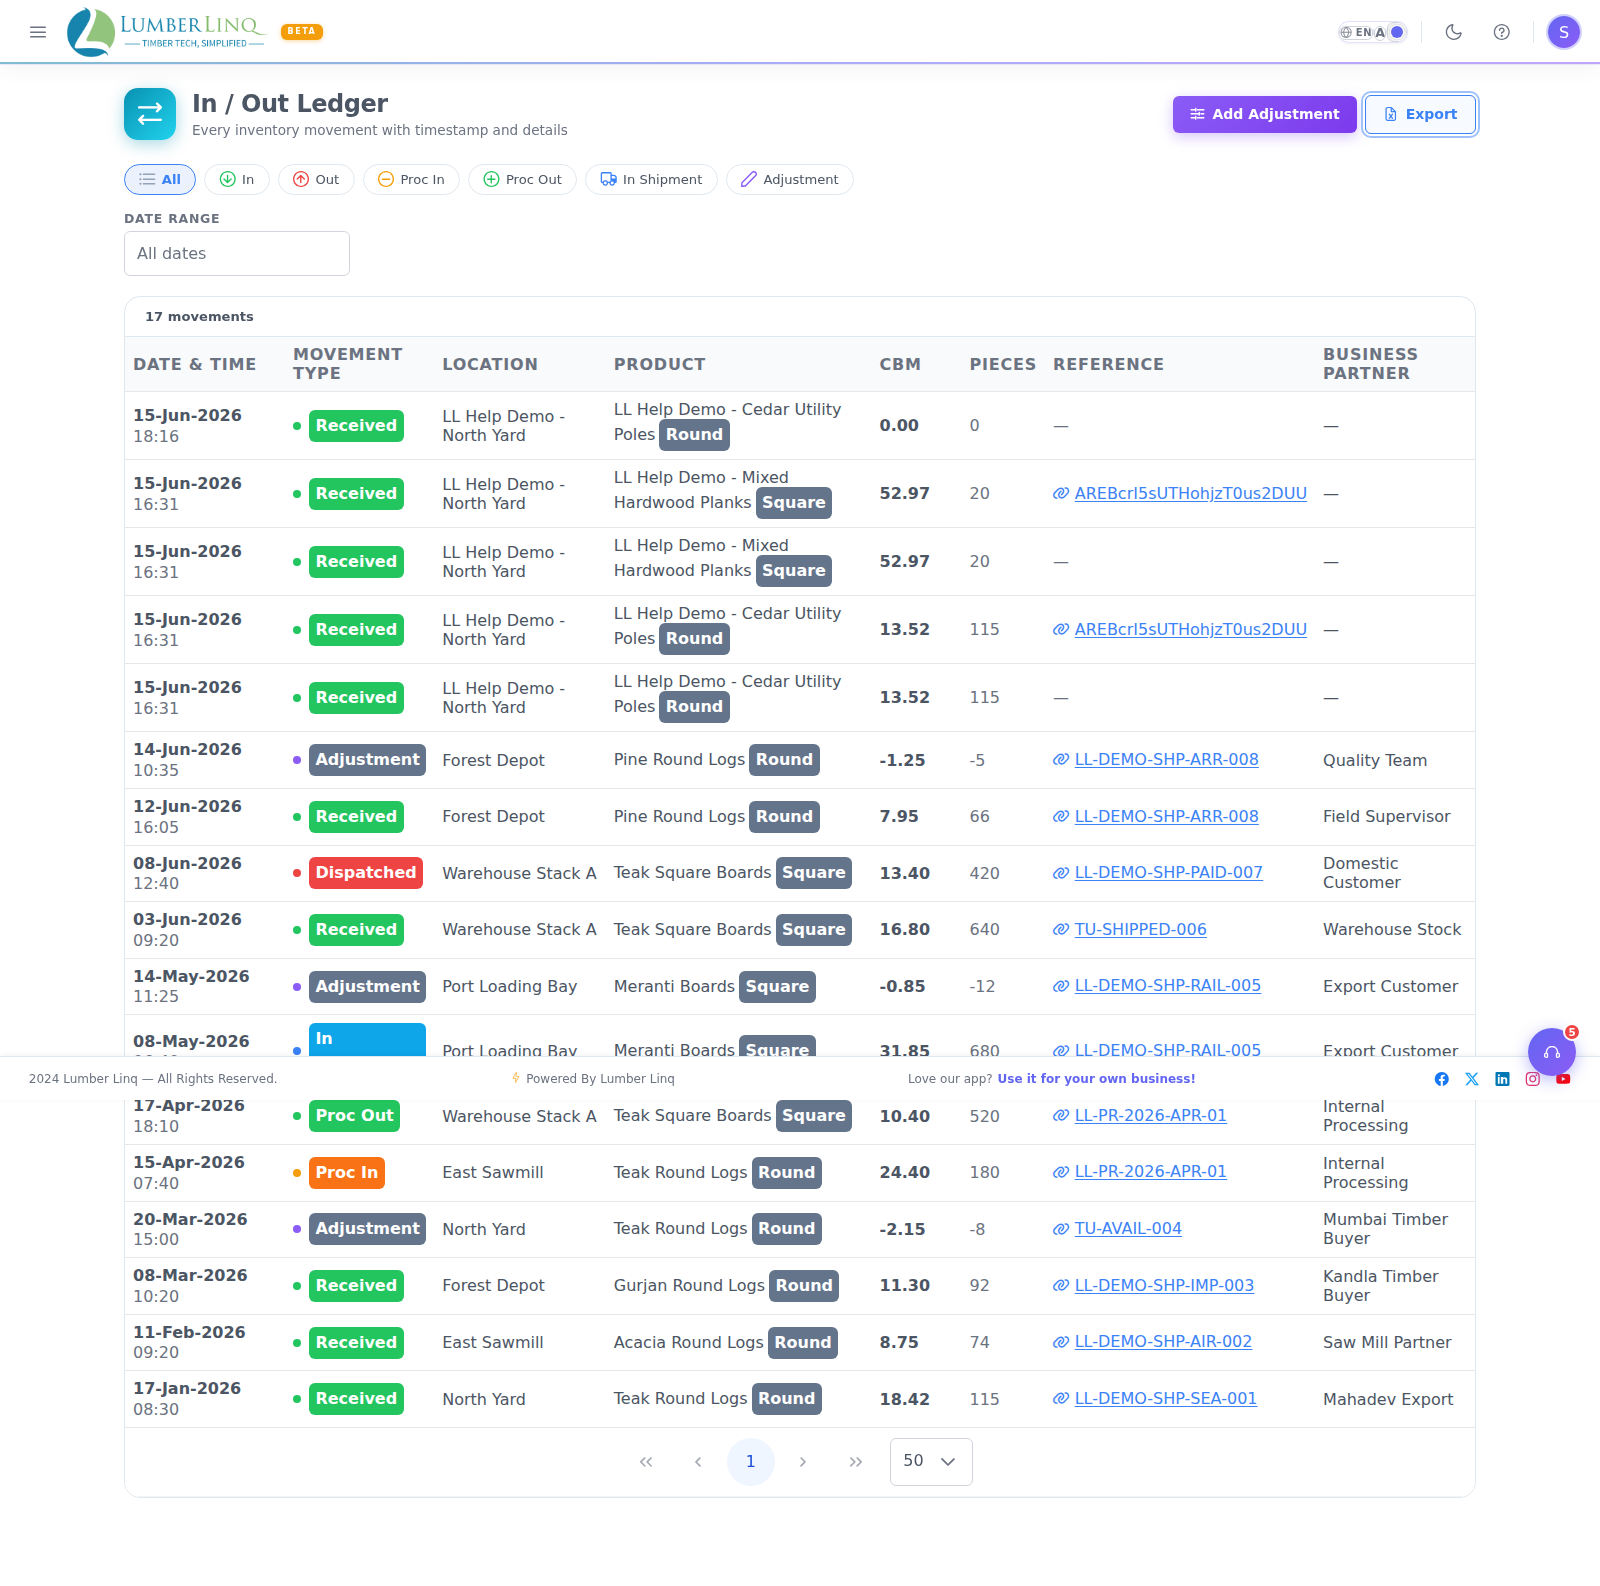
Recording an Adjustment
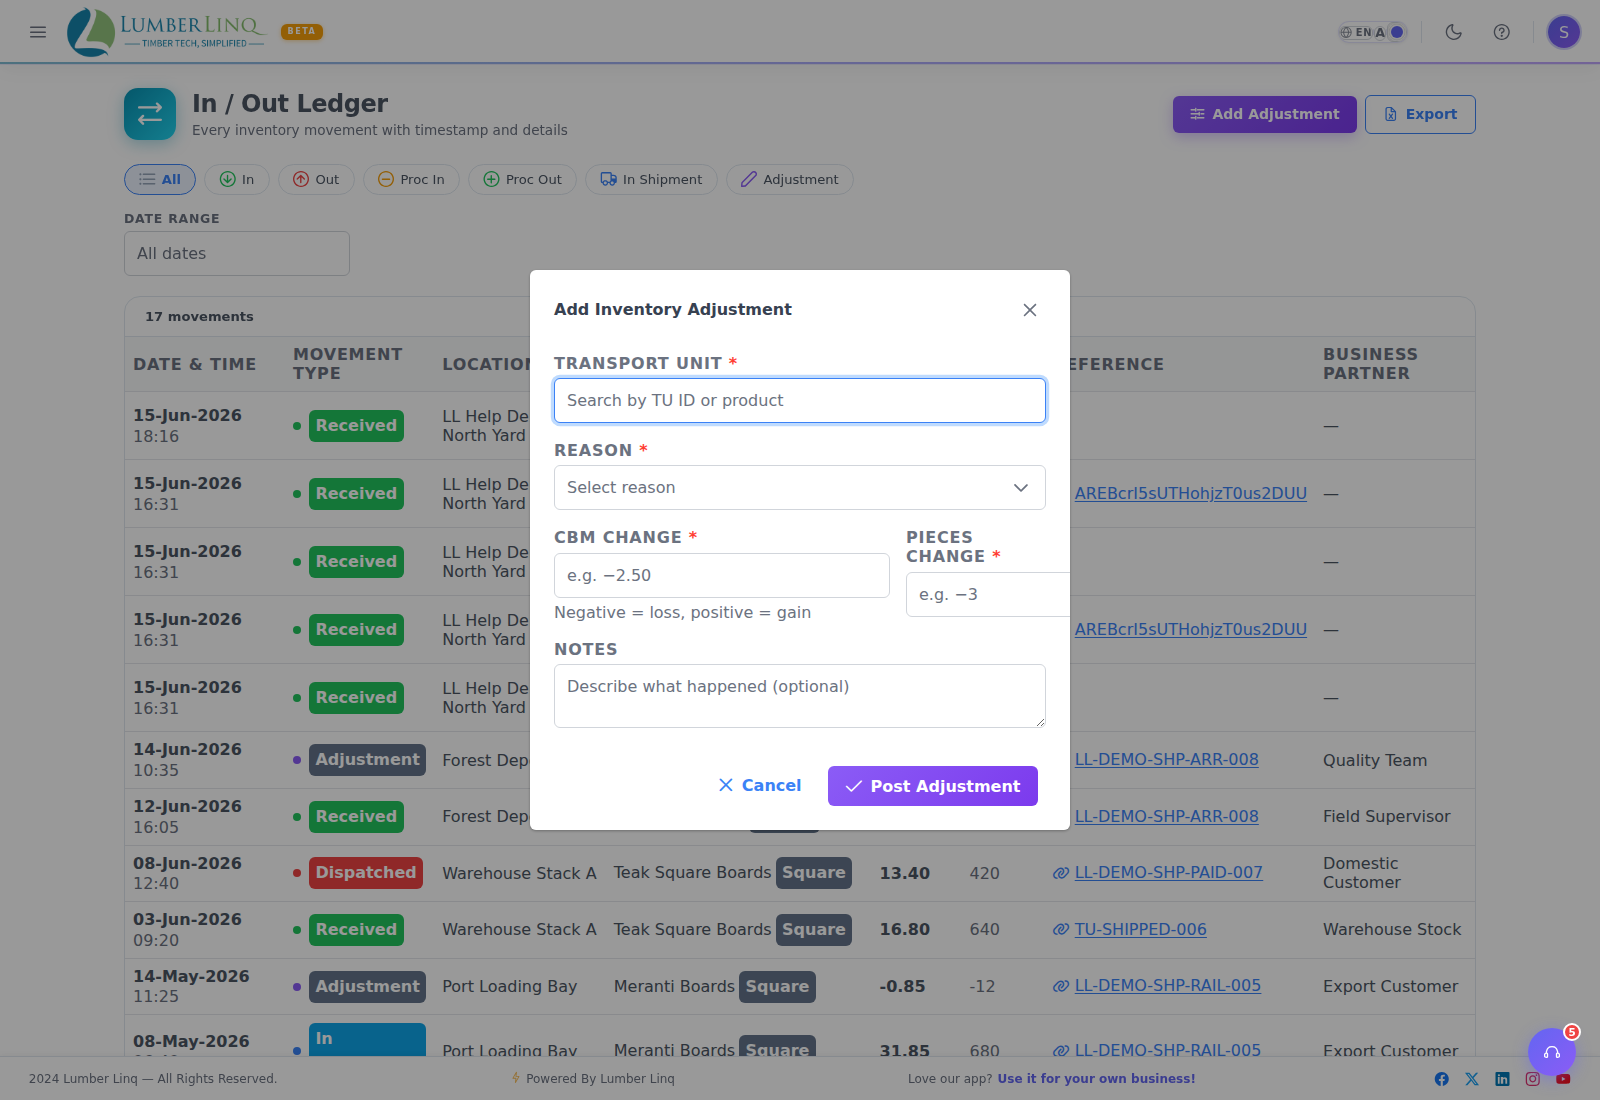
Use Add Adjustment (requires the Inventory Adjust permission) only when recorded stock no longer matches physical reality — e.g. after a stocktake, or when a Stock Unit was damaged. Fill in: the Stock Unit (search by ID/product/location), CBM delta, Pieces delta (positive to add, negative to reduce), a Reason (Reconciliation Delta, Damage, Moisture/Drying Loss, Measurement Error, Manual Correction, or Other), and notes explaining the correction. Don’t use adjustments as a substitute for a normal receipt — if a Stock Unit was physically received but never entered, receive it properly with its Stock Unit’s Receive into Inventory button instead (or Opening Stock for stock you already had when you started).
Reconciliation and Stock
Reconciliation means what really arrived. The Stock Unit’s tally is what was loaded; the count you record at unloading is what you actually have. Example: loaded 19.00 CBM / 500 pcs, counted at unloading 18.75 CBM / 495 pcs.
- Receive first, then reconcile. For a Stock In unit, the Reconciliation tab shows “This Stock Unit isn’t in inventory yet” until it is received — press Receive into Inventory right there, then enter the count and lock.
- Locking puts what arrived into stock. The lock dialog shows the change (e.g. 19.000 → 18.750 CBM · 500 → 495 pcs). Stock always uses the net volume. The Stock Statement shows the received line plus a Reconciled line for the difference (−0.25 CBM / −5 pcs), and every screen — batch cards, Overview, Command Center, stock picker — shows 18.75.
- Pieces are compared like for like: Square = total pieces, Round = total rows (one log each). If the unloading tally is a different kind (Round vs Square), only the volume difference is used.
- Already milled or sold? Then locking only records the difference; correct stock with an Adjustment (the tab offers a pre-filled one).
- The Stock Unit screen shows “Received (reconciled): 18.750 CBM · 495 pcs” once reconciled, so the loading figure isn’t mistaken for stock in hand.
- Adding an Adjustment for the same shortage after a reconciliation shows a warning — the reconciliation already corrected it.
- Companies without Inventory, Stock Out units and opening stock work as before: no “receive first” step, and a lock only records the difference.
Reconcile before milling. When you start a mill run, the Check Before You Start list shows any Stock Unit in that batch that isn’t reconciled yet, with a Reconcile now button (you come back to the run with your entries kept).
- If you start anyway with a Stock Unit that was never reconciled, you type CONFIRM in the same dialog — asked once per Stock Unit. A machine operator starting a job from My Tasks is never asked.
- “Closed without count” (locked with no unloading count) shows as information only — it can’t be reconciled any more.
Reconciling after the batch was milled or sold: the Reconciliation tab says so and offers only Record & lock — stock is not changed. Use Correct with an adjustment →: it opens Add Adjustment already filled in (Stock Unit, the difference, reason “Reconciliation after milling”, a note with the counts) — check it and save.
An adjustment that would take a batch below zero shows the before → after figures and asks you to type CONFIRM in the same dialog.
Stock in Hand — How Much Stock Do I Have?
Open Inventory → Stock in Hand (or tap the Stock on hand tile on Command Center) to see what you really have right now.
- Three totals at the top: In stock is all the wood physically on hand. Held is the part kept for open Stock Outs and Mill Jobs — it is still yours and can still be sold or milled. Free is In stock minus Held: what is available right now for a new sale or Mill Job. Tap or hover the ? next to each label for this explanation.
- Pieces under each total: a line such as Round: 50 logs · Square: 100 pcs shows how many logs (round wood) and pieces (square wood) make up that total. These are whole-company totals and do not change when you search.
- The table lists every product · size · origin · quality · site with In stock, Held (orange), Free (green), pieces and how many Lots (hover for the Lot codes). Search by product, size (for example
4x3x6), origin, site or Lot code, and switch between CBM and CFT. - On a phone each size is a card instead of a table row: three boxes In stock / Held / Free (Free in green), the origin as a tag, and the products as groups with their totals. Tap a card to see the details, including the Lot codes (there is no hover on a phone). On a tablet the Quality and Site columns move into the same details (tap a row).
- Group by product: the switch above the list gives one header per product with its In stock, Held and Free. Tap a header to fold its sizes, or use Collapse all / Expand all. It is on by default on a phone and remembers your choice. When you search, only the matching sizes stay and a group’s totals are of the sizes shown.
- Sort: click a column heading (Product, Size, In stock, Held, Free). Click again to reverse, a third time to return to the default order. On a phone use the sort menu (Free high to low, In stock high to low, Size, Product A–Z).
- Held vs Free bar: a thin bar under the three totals shows the share of Held and Free, from the same numbers as the totals.
- It updates by itself when stock moves. For proof of what happened to stock (received, milled, sold, adjusted), use the Stock Statement.
The Stock Availability Box on a Stock Out
While you tally an unconfirmed Stock Out, a small Stock Availability box floats on the screen. It has one line per product, origin and quality on the sheet, and it updates by itself — no reload — when anyone changes stock.
- Free — the stock you can still use for this sheet, in CBM (tap to switch to CFT) and pieces. Wood held by other open Stock Outs and Mill Jobs is not counted; this sheet’s own rows are not taken off this figure.
- Held by this sheet — the total of the rows on this sheet (saved and not yet saved). It changes as you type.
- Remaining after save — Free minus Held by this sheet. It turns red if the sheet asks for more than is free.
- Tap a row and a size line appears (for example 4×3″ × 6′) with Free · Held (by other sheets) · In stock for that exact size.
If you change a row’s pieces (say 250 to 125) and save, Held by this sheet drops by 125 and Remaining goes up by 125 straight away.
When there is not enough stock (Square tallies). What happens depends on Application Settings → Inventory Policy → “Let sales continue past available stock”:
- Off (the default): a Save that asks for more of a size than is free is refused. Nothing is saved, and a message lists the rows to fix (for example “4 × 3 × 6 ft: needs 150 pcs, only 100 free”).
- On: the Save goes through after you enter a short reason.
- A size that has no stock at all: the row can still be saved. It shows a red dot and holds no stock. Use Request custom-made (in the banner above the tally, or from the Stock Picker in Flexible layout) to ask the mill to make it. Confirm Stock Out is refused until every row has stock; the message names the rows.
Round tallies have no sizes, so this size check does not apply to them.
Custom-Made request from a Stock Out row. The request window has an optional Needed by day (you and the mill are reminded once if the job is still open after it) and starts on Medium priority. The job remembers how many pieces and how much volume the row needs, so the mill sees the target and Finish warns when the output is short (short by N pcs). A request that has not started can be taken back with the small x on the row’s Waiting to start chip (the person who made it, the person who created the tally row, or a manager). Once the mill has started, that row cannot be changed or deleted, and the Stock Unit cannot be deleted or emptied, until the mill job is cancelled. If the row is changed before the mill starts, the job follows it and the operator is told; if that size gets stock in the meantime, the request is cancelled by itself and the operator is told. A job that comes out short sends you a message only partly ready, and you can ask the mill again for the rest.
A live dot for each row (Standard layout). On a Standard-layout Stock Out (one product for every row) a ✨ column shows a dot for each row as you type: green = this size is in stock, amber = nearly all of it is used, red = not enough. Click the dot to see alternatives (a longer or bigger size, another grade or origin). Flexible layout shows the same warnings on each row’s product chip instead.
On a phone, the product chip shows the name on up to two lines. A row with the same product, origin and quality as the row above shows a quiet 〃 instead of repeating the chip (the order of rows never changes, and tapping it still opens the picker). Long-press a chip to see the full product name (on a locked sheet a normal tap shows it). While a product name is still loading, a grey bar shows; the internal product number is never shown.
Why was it sold past stock? When the company setting allows selling past stock, you give a short reason when you save. That reason is then shown on the Stock Unit (“Sold past available stock — reason …”) and, after the Stock Out is confirmed, on the Sold line in the Stock Statement and in the In/Out list.
Stock held by open Stock Outs. On Inventory → Stock in Hand, the card Held by open Stock Outs lists every unconfirmed Stock Out that is holding stock, with how many days it has been idle (green under a week, amber from a week, red from a month). Use Release to free the wood of a forgotten draft in one click. The rows stay on the sheet; it holds the stock again the next time someone opens or saves it.
Confirm needs a saved tally. If the tally still has unsaved rows, Confirm Stock Out asks you to save first — only saved rows are taken out of stock, and the tally locks after Confirm.
When a Received Stock Unit’s Tally Is Changed
If rows are edited on a Stock Unit that was already received, its batch follows the change automatically — one Tally correction line per save in In/Out (the change, not a recount).
The stock is not changed automatically — it waits in a Tally corrections waiting for you panel (on the Stock Unit page and In/Out, and as an item in Command Center) — when:
- it would take the batch below zero and your company doesn’t allow selling past available stock (Application Settings → Inventory Policy);
- the reconciliation is already locked (the arrived figures decide the stock from then on); or
- the Stock Unit was already shipped.
Press Apply to stock or Dismiss (stock unchanged). You need the stock adjustment right to do either.
Processing — Converting Timber Stock (Custom-Made / Re-saw Runs)
While you record a run’s output on its tally, a Recording output for Processing Run bar stays pinned under the header (slim on phones), so you always know which run you are filling in.
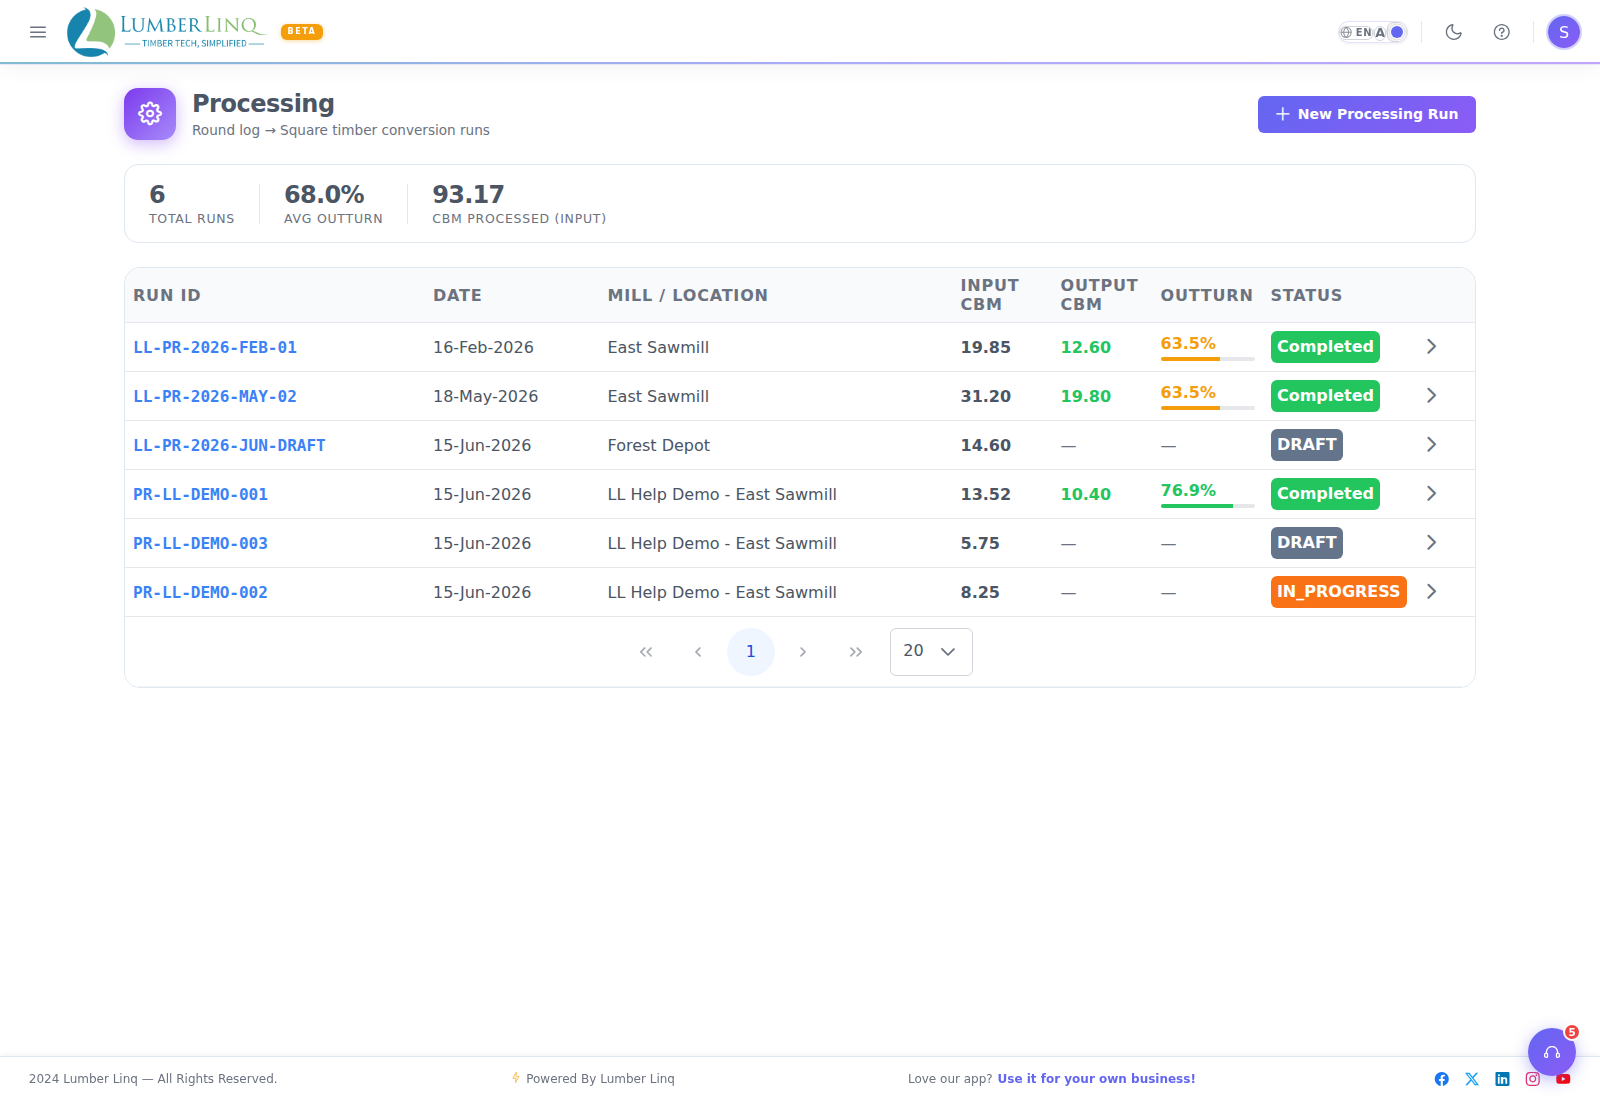
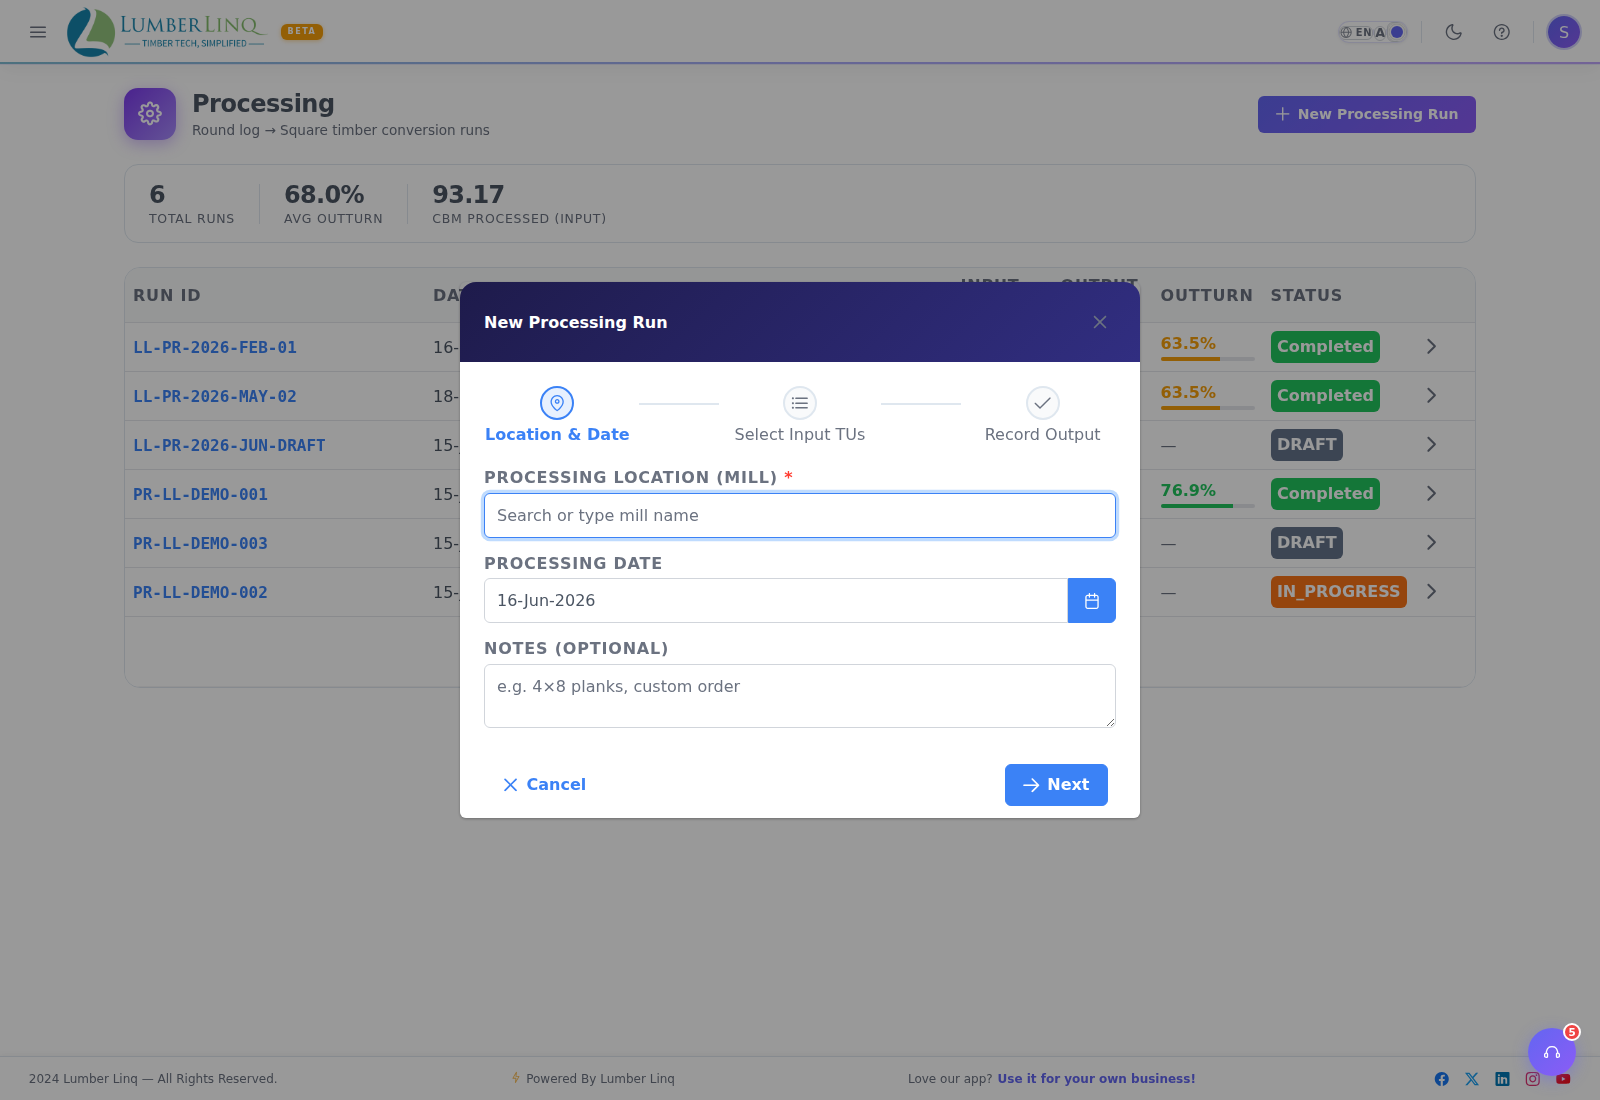
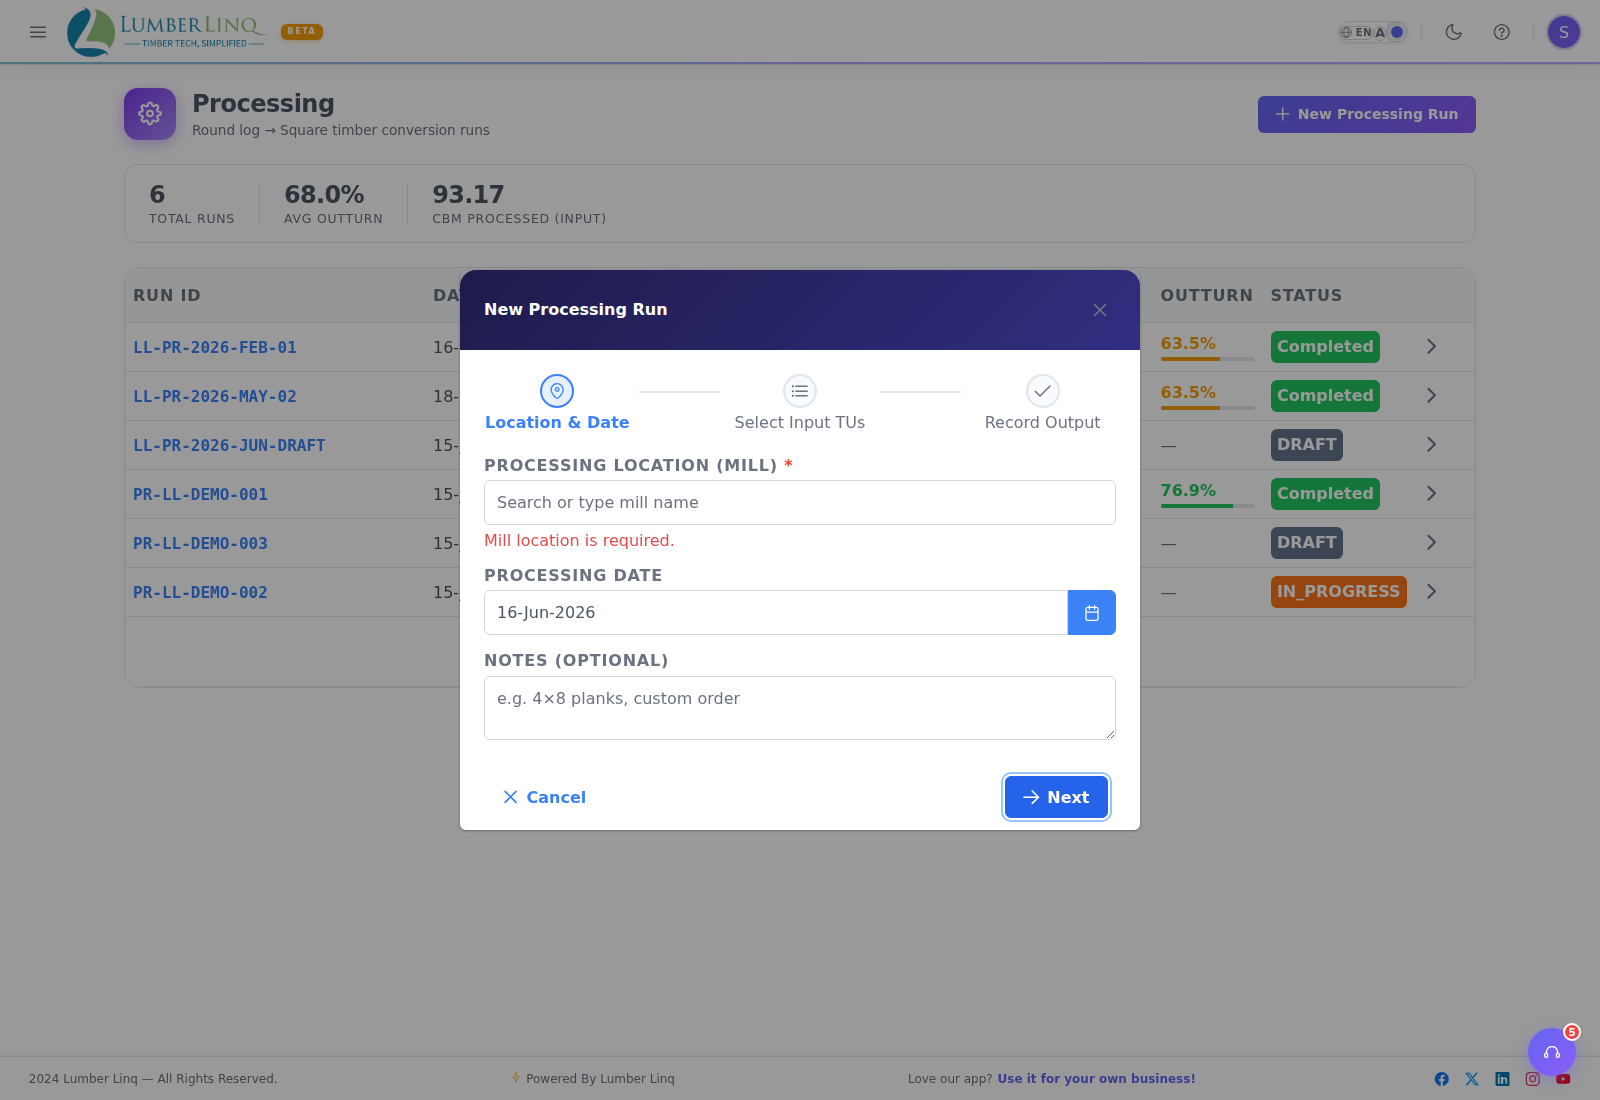
Open Inventory → Processing to convert input timber into a different output — the most common case is round logs re-sawn into square/sawn boards (a Custom-Made run). Click New Processing Run, select the input Stock Units, and enter the output details; the system can auto-suggest likely inputs based on what you’re producing. A run’s status is Draft, In Progress, Paused, Completed, or Cancelled — cancelling reverses the input Stock Unit assignments (allowed from Draft, In Progress, or Paused). A completed run’s output can be linked directly to a new tally sheet so the produced volume is measured and recorded in one flow.
Finishing a job — the Output screen. Press Job Done on a running job. The screen is in four parts, in this order:
- The job — a strip showing how much went in (CBM, product, site) and whether the input is Round or Square.
- What came out — the Output Product and Store At (pick both from the lists). Pick the product first: it decides the tally type.
- How do you record it? — Direct Volume (type the total CBM yourself) or Via Tally Sheet (open the tally, record the pieces, come back — the volume and pieces fill in by themselves). With Via Tally Sheet you see the Tally Type (Round or Square) and why: auto-detected from the product you chose, because the input is sawn timber, or from the linked tally once it has rows. Open Tally stays greyed until the type is known.
- Totals — output volume, output pieces, the pieces taken from the input batch (when the job was fed from a batch), and a live outturn and loss figure.
Rules the screen enforces:
- Sawn timber (a Square input) can only become Square output. For such a job the type is Square straight away, Round products are not offered, and picking one anyway is refused. A Round input may give Square or Round output, so the product you choose decides.
- The tally and the product must agree. If the job’s tally already has rows in one type, a product of the other type is refused (a red note shows, and Open Tally and Complete job are greyed). Pick a matching product or switch to Direct Volume. While the tally is still empty, choosing a different product simply switches its type.
- Output Product and Store At must be picked from the list, not typed freely.
On a phone the screen fills the whole display: the sections sit one under another without boxes, the volume and pieces share a row, and Cancel and Complete job stay pinned at the bottom.
A finished run’s output tally is locked. Once a run is Completed, the output tally you recorded for it is final — the wood has already been added to stock as a new Lot. Opening that tally afterwards shows it read-only: the cells cannot be edited and the Save, Undo and Import buttons are not shown. This is on purpose, so the tally always matches the stock it created. To change the output of a finished run use Edit Output on the run; to correct a stock figure use Add Adjustment — both leave a record of the change.
Pausing a run: if something more urgent needs the mill, click Pause on a running job (an optional note explaining why is available but never required). A paused job can be Resumed back to running, or Cancelled directly without resuming first — nothing about its reserved input stock changes while paused.
Filtering and sorting the list: a Status dropdown above the runs table narrows it to All, Draft, Running, Paused, Finished (Completed + Cancelled together), Completed, or Cancelled. A Sort dropdown next to it reorders by Newest First (default), Oldest First, or Run Code A-Z.
A run can’t ask for more stock than a batch actually has — starting or creating a run checks the chosen batch’s real remaining amount first (after anything else already holding it) and blocks with a clear message if the request is too large, instead of silently creating a run that could never actually finish.
Which purchase does the wood come from? (Detailed Stock Tracking) When a batch was pooled from more than one purchase — say, two different deliveries received into the same Lot — a Mill Run that uses part of that batch needs a fair way to say which of the original purchases the wood being used actually counts against. By default, LumberLinq figures this out silently, oldest purchase first, and keeps a record without showing anything on screen. To see and, if needed, adjust this yourself, turn on Application Settings → Inventory Policy → “Track which purchase a Mill Run’s wood comes from.” Once it’s on, completing a Mill Run against a multi-source batch shows a small panel on the Record Output screen with the suggested split (with a ”?” explaining the oldest-first rule) and lets you edit the amounts before finishing, as long as they still add up to the same total. A batch with only one source never shows this panel — there’s nothing to split.
Mill Operators
Processing runs can be assigned to a Mill Operator — open Inventory → Operators to manage your roster. See the Mill Operators & Custom-Made Processing guide for the full operator workflow.
Quality Grading (ALPHA)
Quality Grading adds an optional quality/color grade to stock, so you can tag and filter it by grade alongside the usual size, species, and origin fields. It’s bundled with Inventory access, not a separate thing to switch on — if Inventory is available on your plan, Quality Grading is too.
The grading vocabulary: every company starts with a fixed set of four grades, labelled A, B, C, and D. The four codes themselves can’t be changed, but the label each one shows can be — click the pencil icon next to any quality dropdown (in tally settings or on a Stock Unit’s product line) to open Rename Grades, and give each code a name that matches how your company actually talks about quality (for example, renaming B to “Second Quality”). The rename applies everywhere the grade is shown, for everyone at your company.
Where you assign or use a grade:
- On a tally sheet — a Square or Round tally’s settings include an optional Quality field for the Transport Unit; it applies that grade to every row tallied on that Transport Unit.
- Receiving into Inventory (including Opening Stock) — the Stock Unit’s product line has an optional Quality field, so you can set or confirm the grade before you press Receive into Inventory.
- Stock Out (selling) — on a Stock Out Stock Unit, each product line has a Quality field, and the available-stock check uses it, so you sell stock of the grade you picked.
Quality Grading is still an ALPHA feature — you’ll see an “ALPHA” label next to it wherever it appears.
Common Problems and Fixes
“I can’t add a Stock Unit to a consignment” — a Stock Unit does not need to be received into inventory first; the two can happen in either order (see “Three Ways Stock Becomes a Batch” above). If adding it still fails, check the tally sheet was fully saved (not just filled in), and confirm the Stock Unit isn’t already assigned to a different consignment or mid-processing run.
“My batch shows no Supplier / Purchase Date / Payment” — this is expected unless the batch came from a Consignment (see “Three Ways Stock Becomes a Batch” above). An Opening Stock batch, or a domestic/manual receipt with no Consignment, has none of the three (older hand-typed batches may have Supplier/Purchase Date, never Payment). If the batch WAS meant to be tied to a Consignment, link that Stock Unit to it — the details will appear automatically, no need to redo the receipt.
“A Stock Unit shows unavailable even though it was received” — check In/Out for an assignment (In Consignment), a Proc IN (currently processing), or confirm it hasn’t already shipped.
“Overview totals look wrong” — check for an uncommitted adjustment or an open processing run that hasn’t been completed; also confirm every tally sheet linked to the affected Stock Units was actually saved.
“Which screen for reconciliation?” — use In/Out for the movement audit trail, and the Reconciliation Report (under Reports) for a structured comparison view.